Seedlisting
What is a seed test
The purpose of a seed test is to let you monitor where your emails fall, into the Inbox or the Spam folder, by sending them to a seed list to pinpoint email issues before sending them to your audience. There is a misconception that your audience will receive the email as long as the email address exists.
Common reasons for your email to land in the spam/junk folder are a low domain/IP reputation, blocklists, risky content, and broken authentication. With a seed test, senders can pre-test a campaign or add the seed list in their regular lists to monitor where messages will land by major inbox providers such as Gmail, Hotmail, Yahoo, AOL many more.
EmailConsul provides you with the information you need to make the right changes to your campaigns, such as inbox placement, IP and domain information, header information, and authentication information.
What is a seed list
A seed list is a list of test email addresses that helps you monitor their placement. The lists contain test addresses at major providers such as Gmail, Hotmail, Yahoo, AOL, and so much more.
When you send a test campaign to the seed list generated in your account, you can monitor where your emails will land when sent. If you see any inbox placement issues, you can dig further into the information EmailConsul provides to fix as many problems as you can before sending your email to your audience.
Email seed list challenges
Engagement and Inbox Placement
Major ISPs take into account engagement for inbox placement instead of spam words or authentication only. As time passes, inbox filtering tools will get even more sophisticated and complex. This means that seed test inbox placements are among the many factors from which you can make changes.
Seed tests are not a perfect measurement and do not represent a complete picture of how successful an email campaign can be. Seed tests are an indicator to inbox placement. These emails are not to be used to warm up your domain or IP reputation; as seed lists are test accounts, there is no engagement associated with them. Their purpose is to let you know where they received the email: in the inbox, the spam/junk folder, or not received at all.
How to do a seed test
Within your account, under the seedlisting tab, click on “Start new seedlisting.” Start by naming your test so that it can be recognizable to you in the future.
Three check types are available to you to ensure that you can easily add the seedlisting emails to your email marketing tool:
Catch with Express email address
Catch with email address
Catch with a tag
Catch with a CC address
Once you have named your seedlisting test and have selected the check type, you must choose the mailbox providers you would like to test. We suggest you analyze your current audience to see which mailbox providers your audience uses. Click on the checkboxes on the right to select a mailbox provider and drag the slider to the number of emails you would like to test. Once you are ready, click on the “Create” button.
Catch with email address
To identify your email seed campaign within EmailConsul, we provide a catch email address, which will be unique for each specific seed test you create. You must send to this catch email address along with the rest of the emails our system gives you so we can accurately tie your results back.
If you have chosen this option for your seedlisting test, you will be given a catch email address and a list of seedlisting emails. You can add all these seedlisting addresses as a separate list or segment by downloading the CSV file provided by EmailConsul, which will include the catch email address or copy-pasting each email address in your email marketing tool.
Catch with a tag
To identify your email seed campaign, we use a tag, which is unique for a specific seed test you create. You must add the tag into your HTML code before you send a seed test campaign. You must use this tag so we could accurately tie your results back. The tag can be added as text in your campaign, in an alt-tag, or even hidden in your email <header> or <body>.
If you have chosen this option for your seedlisting test you will be given a tag (eg:<div style="height:0px;opacity:0;">[econsulsid]####CODE###[/econsulsid]</div>) and a list of seedlisting addresses. You can easily copy this tag and paste it anywhere within your email. You will also be given a list of seedlisting emails that can be added as a separate list or segment by downloading the CSV file provided by EmailConsul.
Catch with a CC address
To identify your email seed campaign, we use a CC email address, which is unique for a specific seed test you create. You must include the CC email address and put it into the CC email field before sending a seed test. You must use this CC email with each seed email address to accurately tie your results back. This is an easy option for those who might not be using email marketing software.
Catch with Express email address
EXPRESS type: For the EXPRESS type, there's no need to create a new seedlisting test each time.
How does it work: Similar to the REF seedlisting test, the EXPRESS seedlisting test analyzes the subject and “To” header of emails. It combines all received emails with the same subject.
Test lifetime: The lifetime of an EXPRESS seedlisting test is ONE hour. If you send multiple tests with the same subject within one hour, it will create a single seedlisting test and store all emails within this test. If one hour has passed since the first seedlisting and you send another test with the same subject, a new test will be created.
Handling unreceived emails: The EXPRESS test does not track unreceived emails.
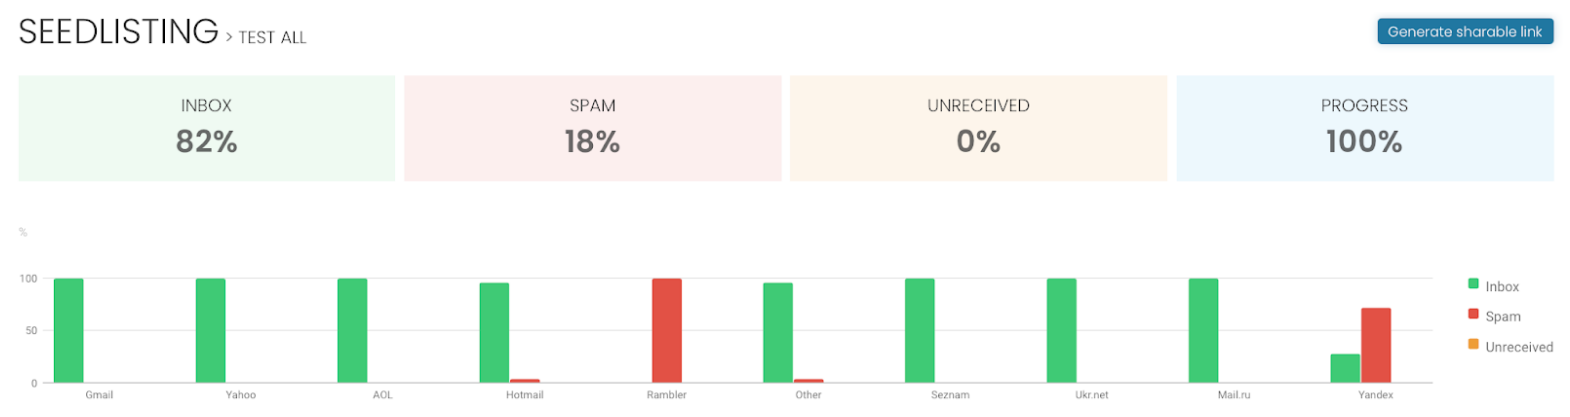
Seedlist Results
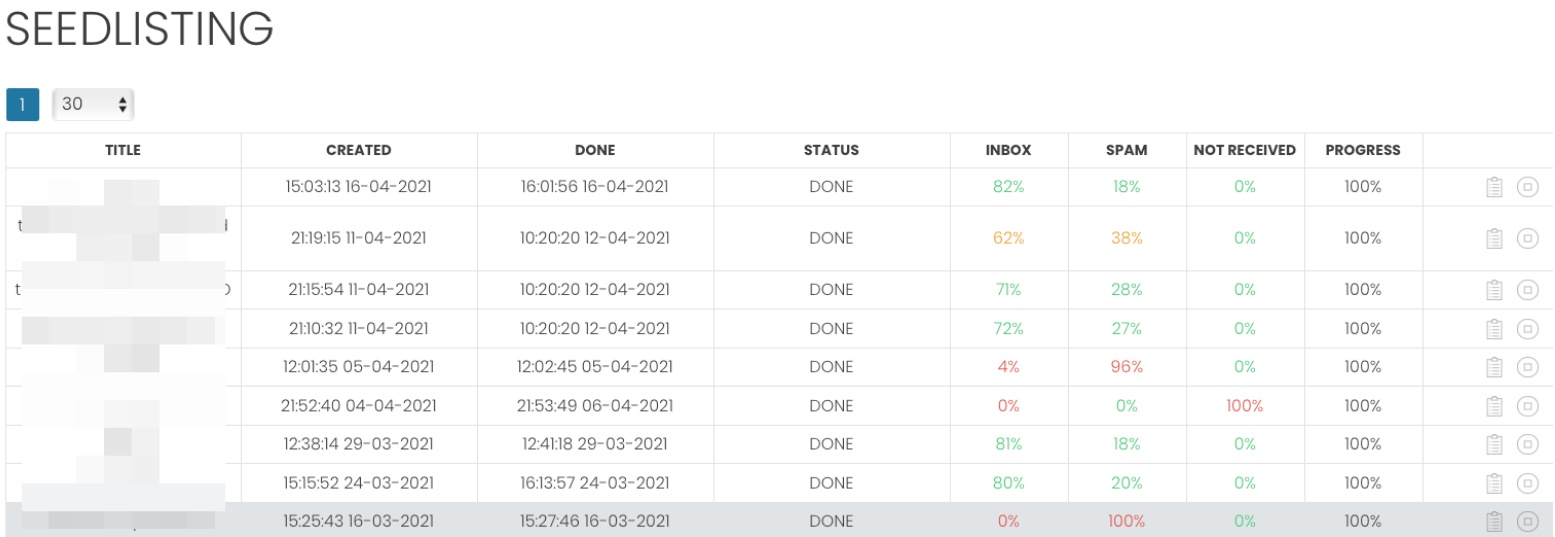
Seedlisting results can be found by clicking on the seedlisting name. At the top, you will find an easy graph separated by each mailbox provider chosen while creating your seedlisting test. In green, you will find the number of emails that landed in the inbox. In red, you will see the number of emails that landed in the junk or spam folder. You would also be able to share the seedlisting results by clicking on the “Generate Shareable link”
Right below, you will see detailed information about each email received by any of the seedlisting addresses. You will see the seedlisting email addresses, the time the ESPs sent the email, and the time it was received. You will also see the from address, subject line along the IP used to send the email. By clicking on any of the rows you will be brought to a page with further granular information.

On this page you can see in the table:
- Headers
The information in the header includes such things as the recipient, the sender, a subject line with the option of sending copies to additional recipients, plus other technical headers that can be added by the sending/recipient mail transfer agent.
- HTML
The system will provide you with the HTML code version for your email content.
- IP Info
The system will grab the IP used to send the email and check it against the major blocklist providers.
- Domain Reputation & Authentication Monitoring
The system will grab the Domain used to send the email and check it against the major blocklist providers.
- Spamassassin
The SpamAssassin filter will verify your content and alert you in case you have any issues to fix.
- Authentication
The system will analyze your SPF, DKIM, and DMARC records and will tell you if they are good or not.